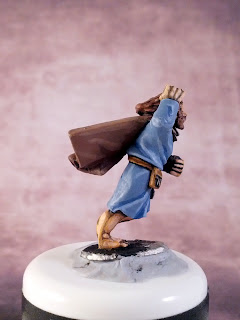
Friday, July 19, 2013

Varnish Test #2

So I decided to do another varnish test since the first one proved inconclusive. I did a couple things differently this time around. For one, I took photos all the way through the process so that if some type of defect appeared I could determine at what stage of the process it happened. I also decided to put some acrylic paint on the test subject, as gloss varnishing over a figure painted only with enamel undercoat was not an "apples to apples" test.

Humbrol Matt Black Enamel Undercoat
First Coat of AP Matte White

Instead of just slopping some white paint over the undercoat, I decided to use this as an opportunity to practice my brushwork. I attempted to leave the usual black edges while using my larger brushes (a size 0 spotter for the most part and a size 000 for the face). I tried keeping the paint diluted as well. That was struggle as usual.

Second Coat of AP Matte White
Humbrol Gloss Coat

My goal was to get the paint the consistency of 'single cream' (as per Dallimore). But I paint so slowly the paint dries on the palette and on the brush (I skipped the wet palette this time). When the paint was really 'wet' I struggled to get it to stick to the figure. This resulted in a lot of extra brushstrokes that left some obvious marks behind. As I mentioned before, I think this problem will resolve itself as I get more confident and start painting more quickly. It sure is a pain right now though.

Two coats of Testor's Dullcote

Well, I don't know if I've proved anything except that I am painstakingly thorough. This figure looks fine to me. Other than some gloopiness in the matte white coats. At least I'm satisfied that the gloss varnish isn't bunko and I've gotten in some low-stakes brushwork practice to boot. Onward to the real figure!

Monday, July 15, 2013

2K!

I've just reached 2,000 page views. The second one sure did come quicker that the first. Thanks for stopping by, ya'll!  =]

An Idea Born Out


Much like Michael Keaton in "Night Shift," I fancy myself an idea man. Or at least I used to. Before age, the endless sleep deprivation of fatherhood, and the pressures of a useless-middle-management job dulled my once sharp mind beyond recognition.

So it was with great elation that a suggestion of mine was taken-up by a games company called Sally 4th in the UK. They had just launched a line of laser-cut MDF figure storage trays and were soliciting suggestions. I thought they'd work better if you could see what was inside them and knew that many companies who laser-cut MDF also did so with Lucite. Lo and behold they started offering the trays with clear tops!


As Hannibal from the A-team would say, "I love it when a plan comes together." Maybe I wasn't the only one that suggested this. And maybe I'm dating myself with these early 80's TV references. However, I choose not to dwell on those thoughts!  =]

Saturday, July 13, 2013

Inspiration (Part 4)


Here's another inspirational book I'm reading. This one was brought to my attention by the excellent article on Y Gododdin by James Morris in Wargames Illustrated issue #300:


Even though this is a Young Adult novel, Sutcliff writes very well and her choice of words and phrasing really captures the feel of a bygone era. For example, when the protagonist notices something he uses the phrase "I mind." It's an archaic usage of the word that, when used consistently, makes you feel as though you are in a different time. It's amazing what a difference in the reading a little thing like that can make.

Thursday, July 11, 2013

Varnish Test #1

So the Dallimore book is pretty pedantic about testing out your varnish before coating a figure you've spent untold hours on. I can certainly relate. However since this was my first foray in the Foundry method, I didn't really have another figure to test on. So I quickly primered up another of the levy and let him dry overnight. Then I hit him with a 75/25 mix of Humbrol gloss coat and Gamsol spirits. Very soon after that I noticed some lighter spots on the figure, and started worrying than my tin of varnish was off. I let him dry thoroughly and decided to hit him with a couple light coats of Testor's dullcote before I came to any conclusions. Here's a quick pic of the little guy:


You can see to the triangle of a lighter color near the center of his chest. And a smaller one down near his belt pouch. So first off, it dawned on me that this might not be the most accurate test since my real figure will be mostly covered with acrylic paint (not enamel like the primer). My second thought was that I had been playing around with diluting the primer with Gamsol as well. Maybe I just didn't get good coverage with the primer in those areas and only noticed it when the gloss went on.

I guess I'll do another test with a figure at least dry-brushed with acrylic paint, but I was curious as to what others think. Thanks!

Wednesday, July 10, 2013

Congrats to a Fellow Blogger

Alex Mayer (who keeps a great blog called alea iacta est) has gotten his fine painting skills featured on the Foundry web site. Well done, Alex!


Alex is another painter who inspired me to attempt to paint in the Foundry "three color method." He is also a good sport and has taken the time to answer all of my noob questions. If you aren't following his blog, you probably should be. While you are over there, offer him a word of congratulations!

Sunday, July 7, 2013

Touching-up done (x2)

I busted out my 10/0 and touched up the black edges that I tried to leave at the edges found on my Scots test levy. Naturally that meant touching up my touch-up as well! Here are some shots. Maybe you can tell, but I busted out the proper light box-thingy I got from Amazon for $40. I think it makes a big difference.


I used my Humbrol Matt Black. It worked better with a little Gamsol to thin it. In a couple of spots my brush strayed and I had to go back and hit it with the tunic and cape base colors again. That said, I'm pretty happy with the outcome overall. My brushwork is a little wobbly and I'm slow as molasses, but that will come in time. I'm going to work on basing him tonight and then I'll post up some comparisons with the "dipped" levy I did previously.

Thursday, July 4, 2013

Hair Doo

Here's my three color method test levy with his hair freshly done:


The base color was going to be the same as his cloak, but I figured that would never do: he'd look like Crystal Gail. So I added in some red and a wee bit of yellow to try to give it slightly more orange hue.

Other than basing, I think he's pretty much done. The only thing I'm tempted to do still is touch up some of the black borders that I accidentally painted over. Not sure I can do this without messing up all the work I've put in already though. We'll see how daring I feel tomorrow night!

Tuesday, July 2, 2013

The Belt of Three Colors

I worked on my three color method some more tonight. This time with my Scots levy's belt:


I'm pretty happy with the way it turned out. I did most of the work with a new 3/0 that I picked up from Amazon. I think I'm starting to get a brush habit too!

I also did some whittlin' on the flat spot I found in his hair last time. I might have gotten a little overzealous. The texture I carved is finer than that found on the rest of his head. But it sure beats that flat spot!

Speaking of hair: that's all that's left and then I'm done with this guy...


Monday, July 1, 2013

Three Color Cape

Here I've attempted to paint my test levy's cape with the three color method. Once again I've gone too light with mid-tone and highlight color and had to go back and hit them with a wash. I'm not entirely happy with the results, but I'm not dissatisfied enough to do it again:


I hope you enjoy the very photogenic background I downloaded off of the teh interwebs.

The hyper-observant among you may have noticed some other changes as well. I went back and tried to tighten up his legs a bit by adding more base color and shrinking the shade color. Also, despite what I told myself (and you, my loyal viewers), I attempted to paint some eyes on him. This is just as hard as they say it is and necessitated repainting most of the face. I still need to shrink the eyes some. I think I might need a 10/0 brush to do it though. I have no idea how some people can paint two-tone eyelids on these little guys.

While I was working I noticed a flat spot on his head that has no hair texture. You can see it in the third photo. I guess I'll have to X-acto some grooves into that patch?

Anyhoo, getting pretty close. Hair, belt, basing and we are done!