Friday, December 27, 2013

Marching Fort corner (part 4)

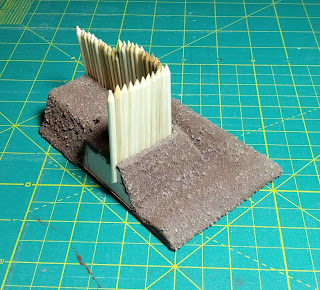
Finally making some progress again after the holy-days. Here are the BBQ skewer stockade walls right after cutting and pointing them. They are just stuck in for fit testing.


Here they are glued into the base. They were first glued to the cross-members and then dry-brushed various shades of grey and brown. I used shorter half-rounds for the cross-members this time. On the last wall section a single, round, cross-member went all the way across. That's one tall tree! Plus, you know my motto: you can't change enough things. I also hit some of the larger stones on the terrain with some greys.


I had an issue when I got started this evening. Red, gold, and green glitter on my model. It seems a Christmas card ended up on the what doubles as my work space and before I knew it was everywhere. Damn stuff a nuisance if you ask me. Perils of crafting during the holidays I suppose...

Getting close to finishing this one up. Next up, some spackle and paint on the ends, a coat of matte varnish, some clear varnish to make the ditch look wet, and then some random foliage bits. Then onto the next section. Maybe the gate? I guess at some point I'll have to revisit my first wall section and make it look more like this one.

Wednesday, December 25, 2013

Merry Christmas & Happy New Year

Not much progress on the marching fort with all the holiday cheer going around. Here's a pic of some of my Christmas swag though. Birthday's just around the corner, so more goodies to come...


Wednesday, December 18, 2013

Marching Fort corner (part 3)

A few quick snaps of the work in progress and a comparison with the less sandy basing technique. I also switched up the color palate and made it less "warm." Because you know, you can never change enough things...


 Guess I better get started sharpening skewers...

Wednesday, December 11, 2013

Marching Fort corner (part 2)

Long time no update. I've been making slow progress, but was laid low for a few days with yet another cold (number three this season for those playing along at home).

I decided to forgo a fancy corner tower or crow's nest and simply raise the level of the dirt berm and stockade at the corner of the fort. I did this by adding bit more pink foam there:


I wasn't super happy with how regular the dirt surface of the last section turned out. I had used a coffee stirrer to apply the Vallejo White Pumice last time. This time I decided to get some more texture by using a paint brush (and a very crappy one at that):


When experimenting, its important to change as many things as possible in one go, that way you'll never know what worked. With that flawed reasoning to motivate me, I decided to also change the way I painted and sealed the terrain. Last time (after struggling to adequately cover the pumice) I ended up using a mix of PVA, Burnt Umber craft paint, and playground sand. 

For this attempt, I used the same three materials, but applied them in sequence. First the PVA, then a mix of playground sand and decorative sand (yet another variable!) on the wet glue:


And then a coat of the Burnt Umber craft paint. This again proved problematic. I ended up having to mix it with PVA to get it to cover some of the deeper dimples in my roughly textured surface.


Next up my favorite part, dry brushing...