Friday, April 26, 2013

Dip Dip Brush

As mentioned previously, I am experimenting with different shading techniques for my minis. I would love to go all Kevin Dallimore on them, but alas, my painting skills aren't there. Or at least, I am not ready to test them yet.

So I've opted for the Army Painter method. I've tried a different technique for each of my three sample Scots levy. I've dipped one figure in the Army Painter 'Strong Tone' QuickShade. While I like the idea of the QuickShade, I'd love to find a less toxic option. To that end I've also dipped a figure in an IKEA water-based wood stain. For the third figure I brushed on some Army Painter Dark Tone ink that came bundled with my starter Warpaints set. I felt like brushing gave me more control, but the dipping and flinging was strangely satisfying. Let's see how they came out.

Here are group shots of before and after (sorry the camera on my phone isn't more consistent):


The differences vary dramatically by technique. Let's start on the left side and work our way right.


This gent was done with just the ink wash. He's still flat (which is nice) but he isn't protected by a coat of varnish either. Kind of a mixed bag. The fingers came out nicely. Not much detail on the face though. The tunic looks pretty good although there seem to be some "tide marks" along the bottom. All-in-all a pretty subtle shading effect. 


This fella was done with the water-based IKEA varnish. He's glossy (but protected!) and the shading effects are very pronounced. Maybe too shaded. I feel like the brownish varnish stuck over all the surfaces, not just the folds and crevices. Perhaps that means the varnish needs diluting? It's inconsistent as well. There are big areas on his legs and tunic that seem untouched. Not too fussed about this one.


This last guy was done with the Army Painter dip. I'm pretty happy with this one. He's the glossiest of the bunch. A little too much varnish in most places. That part is pretty hard to control with the dip method. I think for my next test I'll try brushing on the Army Painter Strong Tone. Many sources suggested this, but I wanted to try the dip method for several reasons. One, it looked kind of fun. Two, it seemed easy. Three, I didn't have to mess with turpentine to clean brushes.

Lots of learnings here. I think brushing is the way to go. I definitely need to use less stain. I also think my base colors could go lighter since they are going to be muddied up pretty well by the stain. I guess it's off to buy some turpentine (or some disposable brushes!). I think I'll toss these guys in some degreaser and start fresh.

Another bit of good news. I'm off to see my first SAGA game tomorrow. A local group of historical gamers are meeting to play at a hobby shop about an hour way. Hoping to find something closer, but it's a start!

Saturday, April 20, 2013

So Much for the Bristles

Well, I knew something was off. For some reason I preferred my synthetic bristle Army Painter "Hobby" brush (that came thrown in with the starter paint set) over the fancy sable hair "Wargamer" brushes. I just couldn't seem to get the paint where I wanted to with the Wargamer brushes.

After a quick inspection and some googling, I found out why that is the case. I had washed all the brushes in hot water. Evidently that's not good for sable. I guess the little critters don't encounter too much hot water out in the wild. Here's what my "points" look like:


I ordered some brush cleaner and conditioner. It's probably too late for these, but it will help my next batch of brushes. Luckily they didn't cost that much, so it won't sting too badly to replace them.

In the plus column, I did finish all of my color blocking tonight for my three test case Scots levy.


Not too shabby considering this was my first attempt and my brushes were fubar.

Friday, April 19, 2013

First Go at Painting

Well, I've had my first go at painting. Overall it was a very enjoyable experience. I feel like there is something meditative about it. I can't wait to get back at it. So far it's just the tunics on three of the Scots levy for a test.


I experimented with diluting the paints this go. I think I might have overdid it. I used a drop of Vallejo Thinner Medium to a drop of the Army Painter Warpaint. I felt like it was a battle to get the color on. For the second coat I opted not to dilute and thought it went on much better. This gave me an idea for highlighting: apply the first coat undiluted and the second coat diluted. The color of the second coat will pool in the deeper areas and darken the color tone there. Maybe.


Obviously I've got more work to do on my flash finding and removal skills. Witness his left shoulder. Sigh. I guess I can always pretend its a fold line in the linen...

One thing I noticed my self doing while painting was holding my breath. I think it was because I was trying so hard to be precise with the brush. My shoulders keep coming up to my ears too. I had to consciously remind myself to relax and enjoy. This is a hobby after all!

I've got mixed feelings about the flesh tone primer. I can definitely see that I've got to be super careful about paint coverage afterwards. But I do like the fact that I'm "saving a step." I guess I'll reserve judgement until things progress a little more.

Next up some more color blocking and then experimenting with different wash/shading techniques.

Tuesday, April 16, 2013

A Primer Primer

Now that the minis and bases were washed, it was on to the primer step. Being new to this hobby I decided to try out the Army Painter method this first time out. It looks like a pretty straightforward way to get good tabletop figures without putting my nascent painting skills to the test prematurely.

I debated what color primer to use. I'd read that white and black were the de facto standards. White being good to make your bright colors pop and black being good to hide the spots you might miss in the deepest darkest recesses of the mini. Since my Scots would have a lot of exposed skin due to the lack of pants, I decided to follow the Celt Regiment example on the Army Painter site and prime them with Barbarian Flesh.


I stuck three of my Scots levy onto a yard stick with Blu-Tack. I then laid a large cardboard box against the wall of the patio. I tried to keep the paint can the recommended distance away and use smooth strokes. With the figures on the yard stick I felt like I was able to move them around enough to give them a good coat. I gave the floor of the patio and some of the screen enclosure a good coat too. I guess next time I'll opt for a larger piece of cardboard.

When all was said and done, I missed a few spots (under the arms, etc). Maybe this is the nature of spraying or maybe I need more practice. Perhaps I shouldn't have based them first (or the yardstick was too wide). This might have prevented the spray getting up under them. Right now, I feel like if I have to bust out the brush to do touch-up, I might as well just prime them with the brush. Much like I feel about using the dishwasher: if I have to rinse the dishes before I put them in, why don't I just wash them by hand in the first place?


I'll give spraying another go, but it seems like a messy proposition. And I haven't even gotten to the varnish slinging phase of the Army Painter method yet.

Of Bathing and Bases

So with a small handful of minis de-flashed, it was time to hit them with some primer. But first I need to give my minis a bath. Who'd have thought such a simple thing can go poorly?

I had read about various methods of cleaning the metal figures: Dawn dish soap, mild degreasers, etc. I found myself at Whole Foods (which I often do since my wife is a hippy vegan) so I picked up a bottle of CitraSolv natural citrus degreaser. All natural, smells good. What's not to like?

I made a dilute mix of CitraSolv and hot water in a mixing bowl. I put the minis in, swished them around a bit. Took them out and gave them a bit of a scrub with a toothbrush with the bristles cut down to about half height (what my dad used to clean his finger nails after working on the car). Then I gave them a good rinse and set them on a towel to dry.

And then I got a bright idea --- always a warning sign. Why not give the polystyrene Renedra bases a quick wash? They probably have some mold release residue too, right? So I put them in and let them stew for a moment. When I went to give them a quick swish around, I didn't feel 30 bases in the mixing bowl. I felt about three. The bases had begin to melt and stick together! I pulled them out and rinsed them in a panic. I pried them all apart and stood them up to dry.


In hindsight, a simple warm, soapy bath would have been best for the bases. But it's not all bad. Now both sides of the bases have a slight texture so I won't have to worry about getting them upside down! Makes me wonder if they don't spray on a solvent to make the texture in the first place.


Monday, April 15, 2013

Flash Flash and more Flash


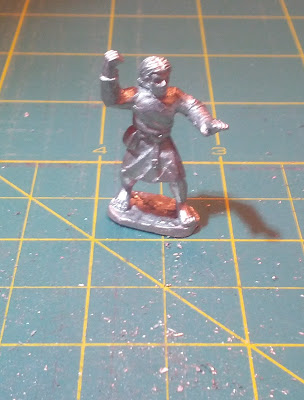
I've begun the task of cleaning up the Gripping Beast levy blister pack. Plenty of cleaning up to do too. Mostly little bits of flash like under this bloke's arm:


I pray to both Wōden and the Nailed God that I get better at finding and removing this stuff. I thought I had the first set of four figures all shipshape and ready for priming. Fortunately I waited for my new eye to arrive before beginning to paint, because I found I had missed quite a bit. And then after I primed them I found I had missed a bit more. And then when I painted their tunics I found I had missed still more. Cheeky bastards...

I guess the moral of the story is to be patient and methodical. Boring as it might seem, I'm going to start doing all the similar figures at the same time. This way I'll get familiar with where the flash lines may lurk by repetition. Here's one of the guys all cleaned up. Or at least so he seems. Until he gets some paint on him!


The astute reader will note the copious amounts of mind-besotting lead dust about him.

The file I had ordered turned out to be way too big for these wee men.  I hadn't the time or patience to order another from Amazon (as I tend to do for most things since I'm a Prime member - quite the trap they've set!). So I struck out one evening to find a proper set of needle files. Hobby Lobby is the local big box place and they are open later than the smaller hobby shops. However, they didn't have needle files. They did have these cool little sanding needles though. I like them a lot as the pointy tip is great for getting into hard to reach places. I seem to burning through them at an alarming rate though and they are not exactly cheap. Maybe I need a lighter touch. Or maybe I need some needle files still. I do like the fact that the sanding needles wear out before the figure does. I'm afraid with a regular rasp file I might get over zealous. More things to experiment with.

Sunday, April 14, 2013

My Kit


While I waited for all my SAGA stuffs from various parts of the world, I had plenty of time to piece together a suitable workspace and the appropriate tools.

My workspace has an additional constraint: it needs to be a portable affair. Our current domicile just isn't large enough to offer a dedicated space and leaving it on the dining room table will not please the wife or keep my four year old daughter away from potential harm (to herself and/or my minis).

After much agonizing and googling, I opted for some bargain-basement plastic organizer bins from the local branch of the Chinese Home Depot. I debated a tiered ArtBin or a fancy, metal toolbox, but in the end I settled on the narrow, organizer bins because they could be arranged around my workspace and keep everything at arms reach.


The bin on the left has all my basing supplies. The top bin has paints, empty bottles, and some metal figures I have not yet started on. The right-hand bin has a smaller organizer within for brushes, files, etc. As well as a chunk of "pluck & pull" foam for holding WIP miniatures.

All in all, I'm pretty pleased with how it worked out. And it all stores away neatly atop a bookcase (out of reach of curious little fingers).

The Beginning

I've been fascinated with the Dark Ages since watching an episode of NOVA about a famous viking sword a few months ago. This led to me finding the most excellent Saxon Stories by Bernard Cornwell. It's been down the wormhole ever since...

By chance I stumbled across a picture of a viking miniature while googling around one day. I've always been a gamer. Well not always, but I started in the 70's with first edition D&D. My love of mini's goes back to 1975 when my brother got an amazing book called The Wargame for Christmas (Thank you, Mrs. Schwartz!). I had a small collection of miniatures in the 80's. I would play around with them, but I never gamed with them. I never bothered painting them either. I think goes a long way toward explaining my eccentric nature! Well, that and genetics...


Back to today: my interest in the Dark Ages and miniatures led me to SAGA. SAGA is a miniatures-based, Dark Age, skirmish game by a UK outfit called Gripping Beast. There's a good intro to it on this much better blog. I've spent a number of weeks researching and acquiring rule books, miniatures, and all the stuff needed to assemble, paint, and base them. A lot of it was mail-ordered and some of it took way too long to get here (I'm looking at you Michigan Toy Soldier!). But finally, I'm all set up with my Scots starter band and a complement of levy.

I'm new to this whole painting of miniatures thing, so I've decided to experiment with some of the different techniques I've read about online. I've been so inspired and educated by the blogs of other hobbyists, that I've decided to document my stumblings publicly. Either that or I'm so intimidated by the quality of the work I've seen out there, I'll do anything to put off painting!